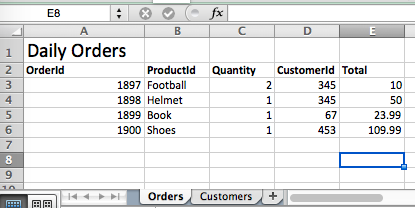
Sometimes you have a requirement to get data out of Excel files as part of your data ingestion process. Perhaps the business users create reports in Excel and then send them to you on a regular basis. Unfortunately though, there is not always a great mechanism to extract data out of Excel files, especially if you want to use the data as part of a data processing pipeline with Azure Data Factory. In this post I outline an approach to leverage and extract data out of Excel files as part of an Azure Data Factory pipeline. Imagine the following scenario: on a daily basis reports are created by the business team in Excel and dropped into an Azure Storage account. Each report contain two sheets - Orders and Customers. The Orders sheet contains the details of the orders for the day and the customer id of the customer who purchased them. The Customers sheet contains the customer details for that day. For this scenario we want to extract just the orders sheet to a CSV file as we already have the customers stored in our data warehouse. Here is the input file:
In building this pipeline we will have two datasets - one input which will be the Excel file and one output that will be the CSV. I will use Azure Batch and a custom .net task to extract out the data from the input file and convert it into CSV.

The custom .net code to extract data out of the Excel file uses the Microsoft.ACE.OLEDB.12.0 provider to open a connection to the Excel data and pull it in for conversion. Since this activity will run on nodes within Azure Batch as part of an Azure Data Factory activity you have to implement the Execute method from the IDotNetActivity interface. When Data Factory executes this activity it will pass in a couple of parameters such as the input and output datasets.
To get started, create a .NET Class Library project and add the code to do the conversion. Here is my full code:
After you have created your class, build it and then go to the build output folder and zip up all the dlls and upload to your Azure Storage account. Note that you have to zip it at the file level and not the output folder level.
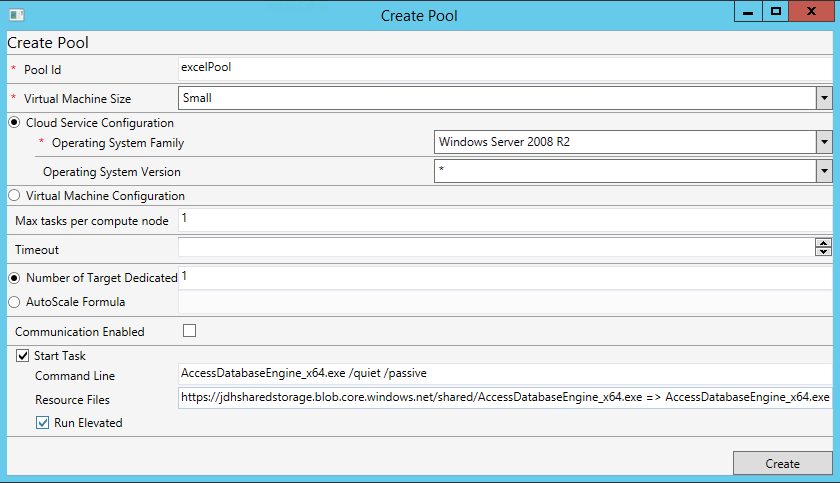
Next you need to create an Azure Batch service. Once the service is created you will need to create a pool to use. This pool will contain the compute nodes to run the activity. For this process, each node will need the Microsoft.ACE.OLEDB.12.0 provider to be installed. The best way to do this is to add the installation as a startup task for each node. This way, whenever a node is spun up it will first install the provider.
You can download the provider here (use the 64 bit one) and then upload to an Azure Storage account container. This will either need to be publicly accessible or use a Shared Access Signature URI.
Below are the steps to create your Azure Batch pool.
- Download and run the Azure Batch Explorer.
- Connect to your Azure Batch Service in the Batch Explorer. (This will require you to build the Batch Explorer project).
- Create a pool within your batch service using the Batch Explorer tool. In the add pool options make sure to set the following
- Check Run Elevated
- Enter this as the Command Line: AccessDatabaseEngine_x64.exe /quiet /passive
- Enter this as Resource Files: <URL TO AccessDatabaseEngine_x64.exe file in Storage> => AccessDatabaseEngine_x64.exe
Now connect your Batch Service to your Data Factory as a linked service. Create a custom activity in your data factory pipeline and point the type properties to the package location and make sure to enter the dll name and namespace.classname of the entry point. See here for more details on how to do this. Make sure to add the input and output datasets to the activity.
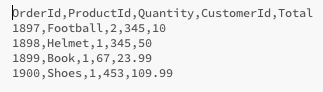
You can then sit back and watch your datafactory pipeline execute and convert your incoming Excel files into CSV. Don’t forget to flag the input dataset as external via the “external”:”true” property. The resulting CSV looks like this:
As you can see, this was a simple use case that could easily be extended to more complex scenarios.