When writing software you are, very quickly, going to run into the need to have some form of source control. It is just inevitable. You might start off, on your own, creating copies of your files in different folders- the poor man’s version control. Very soon you will make changes and think “crap!”, wishing you could revert back to yesterday, or two days ago. But it is too late, there is no history. There isn’t much of anything - except your last saved version and your 3 month old deployed version. You need some control. Source Control in fact. There are a plethora of source control systems out there. Throughout my life I have used a few including Visual Source Safe, Team Foundation Server and briefly SVN. Most recently, I have been exclusively using Team Foundation Server (TFS). Its not bad. It does the job. It does the job far better than Source Safe ever did. Source Safe did the job alright, but you felt that you were also giving it part of your soul on each commit. That kind of deal never works out well in the long run. TFS 2012 has some interesting new features and it seems to be heading in the right direction.
However, I was wanting something more. Something different. I decided I wanted to learn more about Git. I hear about it all the time. This distributed source control system that seems, in concept, simple, clean and yet very powerful. I decided to bite the bullet and manage my first project with Git. This very blog site in fact.
This site is built on the .net stack using asp.net mvc 4. I built it in Visual Studio 2012 using C# for the server components and I was doing it all on Windows 8. I am hosting the site on Microsoft Azure and so I decided it would be an ideal project to manage with Git. And yes, Azure does support Git!
So I had my site built locally and was ready to push it to the cloud. As you read the online resources you will see many refer to using Git through the command line. This can work just as well on Windows. On the Git download page there is a Windows installer. Downloading and installing that gives you

When you install it you have the option of allowing the installer to put Git in your PATH variable which would give you access to Git commands directly from the Window’s command prompt or, Git Bash, which gives you a Bash command window with access to a the Git commands. Git GUI is a graphical representation of your Git repositories which I have not looked at much yet.
The first thing I needed to do was setup an email and name to use for commits. From the Git Bash terminal I ran these two commands:
git config --global user.email "your@emailaddress.com"
git config --global user.name "your name"
The next step was for me to set up my Git repository. Opening Git Bash I navigate to my blog application source directory and type
git init
This initializes the Git repository for me. Now to add my files to this repository
git add .
This enumerates all the files in the current directory and adds them to this Git repository. Note, that they are just staged at this point and are not commmited yet. That is the next step.
git commit -m "Initial commit for project"
This commits the added files to the repository. Note that the git commit command requires a message parameter (-m) to describe the commit. I can see this being important as you build up change sets so know what you commited in each change set.
That was it! At this point I am ready to start working with my repository.
I can go and make changes in my application and commit them along the way. For example, I want to change how the date for my blog posts is displayed. I go into my code and, in the BlogPost model I modify
[Display(Name = "Created On")]
[DisplayFormat(DataFormatString = "{0:f}")]
public DateTime CreatedOn { get; set; }
to
[Display(Name = "Created On")]
[DisplayFormat(DataFormatString = "{0:g}")]
public DateTime CreatedOn { get; set; }
I would save this file, go back to my Git bash terminal and type
git commit -am "Modified created date format from full to general"
And this would write my change to the repository. (Notice the -am. The a means commit all staged changes.) We don’t have to use the add command here as Git detects the changed files for us.
Supposing then I decided to go ahead and add a new property to my BlogPost Model - e.g. a post summary. I add this in the model, with the appropriate database changes etc.
Running
git status
will show me that the change has been detected and what files are involved.

Next I commit that change
git commit -am "Added blog post summary to blog post model"
Then, I realize that this blog post summary is making things more complicated and is unnecessary. I want to undo that change - but I don’t want to lose my date format change.
This is easy in Git.
git log
will display a list of all changesets.
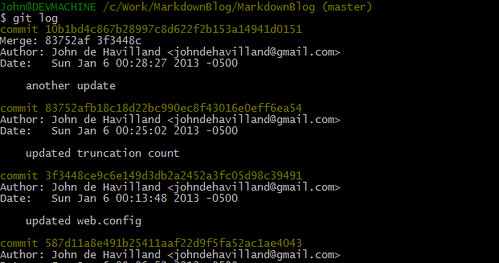
As you can see there are three. I want to undo my last change set and go back to the second one.
git reset --hard HEAD^
This will undo my last commit. If we look at the log again we can see that it has, indeed, reverted back. There are other details about this that can be found in the Git documentation.
So now I have Git working locally how can I go about using it to get my site into the cloud. Well, as I mentioned before, Azure supports Git repositories. Basically when I set up my Azure site I can tell it that I want to use a Git repository and it gives me the connection information.
All that remains to be done is to clone my local Git repository into the Azure one. First I have to setup information about this Azure Git repository locally by running this command:
git remote add [name-of-repo] [login-details]
then I can simply push my existing repository to this remote one with this command:
git push [name-of-repo] master
This will prompt me for a password for the Azure repository, I enter that and it begins to push my local master branch to Azure. Once the push is complete Azure then takes my package settings and publishes my web site.
And that is it. I have my site up and running. I can make changes locally, commit them locally and when I am ready - push them to Azure. The other cool thing about this is the fact that I can see my Git commits right from the Azure dashboard.

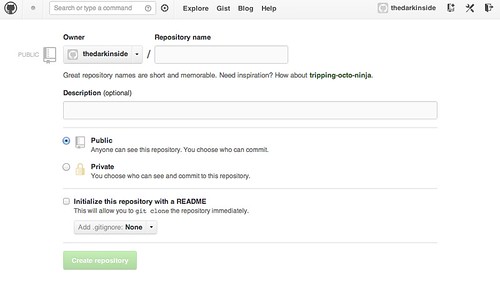
The final thing I wanted to do was try out Github. I wanted to publish my blog site source code on Github. This is pretty straight forward to do. First, I went to Github and registered. Once registered I can go in and create a repository.
Then locally I can add that repository as a remote repository, just in the same manner that I made the Azure site a remote repository.
git remote add github https://github.com/[my-github-username]/[my-github-repo-name].git
Now I can push my changes to Github as well.
git push github master
and voila they appear in the Github repository.
My first foray into Git was a good one. I have a lot to learn - a helluva a lot - but for now, I have some basic pieces in place.
Some things of note
-
Once you start commiting changes to Git locally, that history will also be pushed to other repositories so be careful not to include any login information in web.configs or anything. I made this mistake pushing to GitHub the first time. I did not realize it would push all my history and so when I saw my previous commits containing password information I was a little concerned.
-
Windows Azure comes with some Git Command tools- I have yet to look at those.
-
When you create the Git repository locally, you may also want to create a .git-ignore file to include files you don’t want to have as part of the repository. This file is created at the root of your repository and is just named .git-ignore.